
The Time has Come to Prep Your Water Heater Using 5 Easy Steps!
Winters here can be chilly, and just imagine what it would be like to face a cold snap without any hot water available from your taps. Or imagine having family over for the holiday season and telling guests not to shower because your water heater broke down.

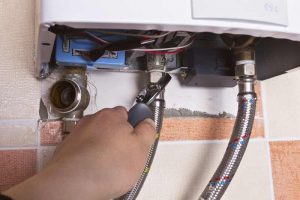
To avoid these uncomfortable and cold situations, take action now to get your water heater ready for this fall and winter.
1. Make sure the TPR valve is working.
 This valve is a safety device that lets the unit stabilize itself when the pressure or temperature inside the tank increases to dangerous levels.
You should test yours regularly, and some experts even recommend monthly testing. To check the valve:
- Flip the manual lever to open the valve
- Check the discharge pipe for an outpouring of water
- Shut the lever to close the valve
Test Outcomes
Water came pouring out: This is a good thing. It’s what's supposed to happen, and this indicates your TPR valve is functioning optimally.
No water, or very little water came out: This is not good, and it means there's a problem with the valve (if the pressure or temperature became too high and the valve doesn’t release water, the pressure inside the tank will continue to build). Replace the valve immediately.
2. Check the Thermostat
 The thermostat on your water heater indicates the temperature of the water coming out of your taps. You can set the thermostat to 120° F, which is an energy-saving temperature that will prevent scalds and burns, or you can set the thermostat to 140° F, which will produce hotter water and kill more bacteria.
Just make sure everyone in the house is careful, as water this hot can easily cause burns.
3. Inspect the Anode Rod for Rust Damage
The anode rod is one of two rust-protecting features in your water heater tank (the other is a glass lining) that help stop the tank from corroding. But when the anode rod itself becomes completely corroded, it stops working and needs to be replaced.
Inspection and replacement frequency: Inspect the anode rod during your yearly fall maintenance, and replace it when it’s fully corroded about every five years.
4. Remove Sediment From the Tank
How on Earth do you do this, you ask? It’s quite simple—you drain the water out of the tank and replace it with new water. By flushing out the old water, you also remove all the sediment and minerals that have built up on the bottom of the tank.

5. Add More Insulation to the Pipes and Tank
Newer water heaters come with plenty of insulation inside the tank, which is why the outside of the tank will be cold to the touch. But if your water heater feels warm on the outside, it means energy is escaping.
To fix this, outfit the tank with an insulating blanket, and install sleeves on the pipes to keep the heat where it belongs. Once you insulate the pipes, you may find you can turn down the temperature of the water and save money on your energy bills.
Making sure that your water heater is in good working order will give you peace of mind this fall and winter, and you'll be able to rest easy knowing that family, friends, and holiday guests will have access to all the hot water they need.
If you could use an extra hand with these maintenance steps or with other plumbing problems in the house, call PlumbCrazy in Abingdon, MD at 410-679-7575.